Here is an actual case of configuring the http_adapter based on experiences of migrating two internal services from Content Gateway to Opaali with minimal changes to the services. (The names and other details have been changed.)
Two services
1: a query-response service

This was a standard query-response type service where the reply that will be sent back to the handset comes in the response part of the HTTP-request. Unlike many (most?) services this one had keywords and parameters that contained scandinavian characters like ‘Ä’ and ‘Ö’, which prompted many of the changes mentioned in the previous article. It was important that the correct encoding was kept througout on the route to the backend service and back.
2: a query-response service implemented as separate receive-only and send services
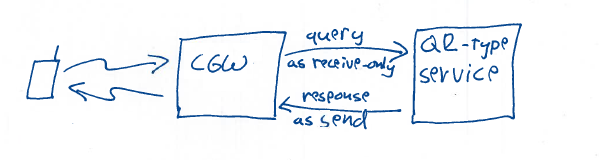
This was also a query-response type of service, but implemented as separate receiveonly and send services. This was a common type of implementation for services which might need a long time for processing the request and there was the risk of a HTTP-request timeout. Opaali has even stricter timeouts than Content Gateway. The incoming requests did not contain any scandinavian characters, but the replies did. This service was going to make a new implementation of the backend service and one of the decisions to be made was whether to use Latin-1 or UTF-8 encoding. To make it possible to defer making the decision, we decided to create two separate send services: one using Latin-1 and the other using UTF-8.
Common setup
Before going any further, lets set up the common settings (port, logging, etc.) at the beginning of the config file:
# HTTP adapter configuration file
#
# common config parameters are at the beginning
# server port
port=8888

# log file name
log_file=/opt/http-adapter-8888/log/http_adapter-.log
# log level: 0=NONE, 1=ERROR, 2=WARNING, 3=INFO, 4=DEBUG,
log_level=3
# always log to stderr too: 0=no, 1=yes
log_stderr=1
# append to existing log file: 0=no, 1=yes
log_append=1
# log_rotate - insert current date before last dot in filename: 0=no 1=yes
log_rotate=1


# by default the http server is single threaded
# which may lead to lockups especially if you
# have more than one service configured
#
# you probably want to configure multiple threads
# using a thread pool
#
# set the threadpool size for http-server (optional, default is 1)
threadPoolSize=10
Choosing the log_level
If you set the log_level below INFO you will have very small and clean log files with only ERRORs and WARNINGs listed, but it may be difficult to tell where they refer without seeing any details of the requests that generated them. In practice you probably want log_level=INFO which will list all the requests and their responses.
Starting with the send service
The regular CGW-style send service was configured as usual, accepting requests using ISO-8859-1 (Latin-1) as that is common for (very) old services.
# service type "cgw" is for sending MT messages using
# Content Gateway type of http request
[send:cgw]
# character set for CGW API side
cgwCharset=ISO-8859-1
# replace these with your own credentials (these won't work)
applicationUserName=643a4................aa1a5075af
applicationPassword=(?Kv...p

# mask specified request parameters with '*' in log at log_level info
# -format: (key, position, length)
# -replaces key value (from left to right) starting from given position with '*' up to given length or end of value
# -if position is negative, applies mask right to left from end of value
# -length is optional, if omitted applies mask until the end/start of value
log_mask=(to,-2,4),(msg,15)
So we create a service called send, which expects requests using character set ISO-8859-1 and masks parts of the recipient number and message content when writing log entries.
Adding another send service
We’ll then add a similar service called send-utf8 which expects character set to be UTF-8. Note that we’ll need a separate set of Opaali credentials (i.e. another Opaali application), otherwise the two send-services will fight for the same access_token.
# service type "cgw" is for sending MT messages using
# Content Gateway type of http request
[send-utf8:cgw]
# character set for CGW API side
cgwCharset=UTF-8
# replace these with your own credentials (these won't work)
applicationUserName=163a4................aa1a0575af
applicationPassword=?Nv(...x

# mask specified request parameters with '*' in log at log_level info
# -format: (key, position, length)
# -replaces key value (from left to right) starting from given position with '*' up to given length or end of value
# -if position is negative, applies mask right to left from end of value
# -length is optional, if omitted applies mask until the end/start of value
log_mask=(to,-2,4),(msg,15)
Creating a query-response service
We’ll create a qr type service at /queryresponse:
# service type "qr" is a variant of "receive" service where the response body (if there is one)
# is returned to the caller in a separate, queued MT request to mimic the functionality of
# CGW QR services
[queryresponse:qr]
# see above for log_mask usage
log_mask=(msisdn,-2,4),(msg,15)

# a default URL is called when no there is no
# other matching configuration
defaultUrl=
# a separate mapping file can be used for choosing the target
# based on keyword and/or short code
mappingFile=mappings.txt

# defaultReplyUrl is used to specify how the MT message for a Query Reply is sent,
# this can be the "cgw" service from the top of this configuration file
# notice how the $(MSG) macro is escaped by doubling the $,
# here the macros are expanded in two passes, once when creating the queued request
# (for sender/recipient) and again when the message content is available
defaultReplyUrl=http://localhost:8888/send-utf8?to=$(M)&from=$(R)&msg=$$(MSG)
A separate mappingfile mappings.txt will contain mappings from (keyword, servicenumber) pairs to a backend service URL.
Notice that defaultUrl is always a mandatory parameter, but if you also specify a mappingFile you can leave defaultUrl as empty. (But if no match is found in mappingFile and defaultUrl is empty, the end user will not be notified that the request was ignored. You may want to point defaultUrl to some system that will send an error message back.)
Notice that you need to specify how the response is sent back to the handset. In this case we use the send service at /send-utf8 to send the response. Also notice that the macros in this URL are expanded twice (or actually in two phases):
- first the sender’s msisdn is set as the recipient and the service number is set as the sender. At this point the macro
$$(MSG)is replaced with$(MSG)which is still a macro that will be expanded at the next phase. - when the response text is ready it will be inserted to
$(MSG).
So what will our configuration look like?

(Notice that the callback and send API calls between Opaali and http_adapter are always the same, but the application type (QR vs. separate receive-only and BULK-MT) you need to create in Opaali depends on your contract with the operator.)
Creating a receive-only service
The service using a separate send service for MT replies returns just “OK” as response to requests. Initially this service was configured to use the same notification endpoint as the existing query-reponse service. This had the unwanted side effect that before the actual reply reached the handset, another MT message with the content “OK” was received. To avoid this we needed to create a separate receiveonly service, which does not send any MT messages back to the handset.
# service type "receive" is a receive-only type of service where the response body (if there is one)
# is ignored and NOT sent back to the caller
[receiveonly:receive]
#
# see above for log_mask usage
log_mask=(msisdn,-2,4),(msg,15)

# incoming MO message notifications will be sent
# to a configurable target service using
# Content Gateway style HTTP GET requests
# using template URLs with macros filled in
# (notice that NOT all of the CGW macros are supported)
#
# a default URL is called when no there is no
# other matching configuration
defaultUrl=
#
# a separate mapping file can be used for choosing the target
# based on keyword and/or short code
mappingFile=mappings.txt
You can use the same mappingfile for both services, but it will be loaded into memory twice.
The service will look like this:

What if you run into performance problems?
Opaali callback notifications will time out if the HTTP-response is not completed in 10 seconds. If the request made by the http_adapter to the backend service takes longer, what to do?
The http_adapter implements optional asynchronous processing of callback notifications. This means that as soon as the callback HTTP-request has been received the resulting http-request to the back end service is put into an internal queue to be processed later and a success status is returned to Opaali. That is actually the only thing Opaali is interested in – the message is no longer Opaali’s responsibility. Note that, when the queued request is finally made there is no easy way to communicate errors back to the end user, in case e.g. the connection to the back end service eventually fails.
How to configure asynchronous processing of notifications?
There are a couple of configuration changes you need to do to enable asynchronous callback processing.
- You need to set
nowait=1in the http_adapter configuration section of the notification service. - You need to change the callback URL in Opaali application settings by appending
/nowaitto it.
Why does it need to be done both in Opaali and http_adapter settings? If the systems are administered by separate teams they should not be able to change the behaviour of the other system without its administration being aware of this.
(What I mean is that the semantics of the http-request change in nowait-mode – a successful request no longer means that the notification has been successfully processed, it only means that is was successfully received, and the notifier should be aware of this. Also, the internal queue may overflow during heavy traffic so it must be possible to disable asynchronous processing at the http_adapter side.)
 JPLa is a member of the Content Gateway (CGW) to Opaali migration team, specialising in programming related issues and API usage.