Here is a little seasonal IOT example which I (almost) finished during my Xmas Holiday.
This Xmas I got a 3D Xmas Tree from The PiHut for my Raspberry Pi SBC (Single Board Computer).
While looking for software to make the LEDs on the tree to blink, I found code for converting text to Morse Code here.
So I decided to make an Opaali application which lets you SMS your message to be blinked and you would also get the text in Morse Code as a response (just in case you are nowhere near to see the actual tree blinking – welcome to the wonderful world of Internet Of Things (IOT)).
Hacking together a Python script
I’m not really much of a Python coder, but I managed to hack together the following program from the bits and pieces available at that GitHub repository.
- first I converted the Morse Code example to get its input from the command line instead of querying it interactively.
- I also made the code to print out the morse code it had blinked
- Because a bare tree with only the star lit looked rather sad, I took parts from another example to randomly light the red “candles” when a new message starts
(I also made the text to be blinked to be the second command line parameter so that I could include the message senderAddress as the first parameter…I’ll tell you why a little later.)
Here is my hacked-together morsecode.py Python script:
#!/usr/bin/python
# coding: ISO-8859-15

import sys
import random

from gpiozero import LEDBoard
from gpiozero import LED
from time import sleep

CODE = {' ': ' ',
        "'": '.----.',
        '(': '-.--.-',
        ')': '-.--.-',
        ',': '--..--',
        '-': '-....-',
        '.': '.-.-.-',
        '/': '-..-.',
        '0': '-----',
        '1': '.----',
        '2': '..---',
        '3': '...--',
        '4': '....-',
        '5': '.....',
        '6': '-....',
        '7': '--...',
        '8': '---..',
        '9': '----.',
        ':': '---...',
        ';': '-.-.-.',
        '?': '..--..',
        'A': '.-',
        'B': '-...',
        'C': '-.-.',
        'D': '-..',
        'E': '.',
        'F': '..-.',
        'G': '--.',
        'H': '....',
        'I': '..',
        'J': '.---',
        'K': '-.-',
        'L': '.-..',
        'M': '--',
        'N': '-.',
        'O': '---',
        'P': '.--.',
        'Q': '--.-',
        'R': '.-.',
        'S': '...',
        'T': '-',
        'U': '..-',
        'V': '...-',
        'W': '.--',
        'X': '-..-',
        'Y': '-.--',
        'Z': '--..',
        '_': '..--.-'}

led = LED(2)
led.off()

def dot():
    led.on()
    sleep(0.2)
    led.off()
    sleep(0.2)

def dash():
    led.on()
    sleep(0.5)
    led.off()
    sleep(0.2)


treelights=[ 18, 5, 9, 11, 21, 10, 7, 12, 6, 1,14, 3, 20, 24, 13, 15,2, 17, 16, 23,8, 22, 4, 19 ]
treemap={ 1:4, 7:5, 16:6, 22:7, 6:8 , 14:9, 8:10, 21:11, 15:12, 3:13, 19:14, 2:15, 9:16, 10:17, 20:18, 18:19,17:20, 4:21, 24:22, 23:23, 13:
24, 5:25, 12:26, 11:27
}

leds=LEDBoard(*range(4,28), pwm=True)

def labelToPin(l):
  return treemap[l]

def toBoard(l):
  return labelToPin(l)-4

# light up some random candles
for i in treelights:
#    sleep(0.4)
    if random.randint(0,1) > 0:
        leds.on(toBoard(i))
    else:
        leds.off(toBoard(i))

# we want two command line arguments
if len(sys.argv) == 3:
    s=sys.argv[1] + ' "'
    input = sys.argv[2]
    for letter in input:
            if not letter.upper() in CODE:
                ltr = '?'
            else:
                ltr = letter
            for symbol in CODE[ltr.upper()]:
                s+=symbol
                if symbol == '-':
                    dash()
                elif symbol == '.':
                    dot()
                else:
                    sleep(0.5)
            sleep(0.5)
            s+=" "
    print s+'"'
Building a Morse Code Service
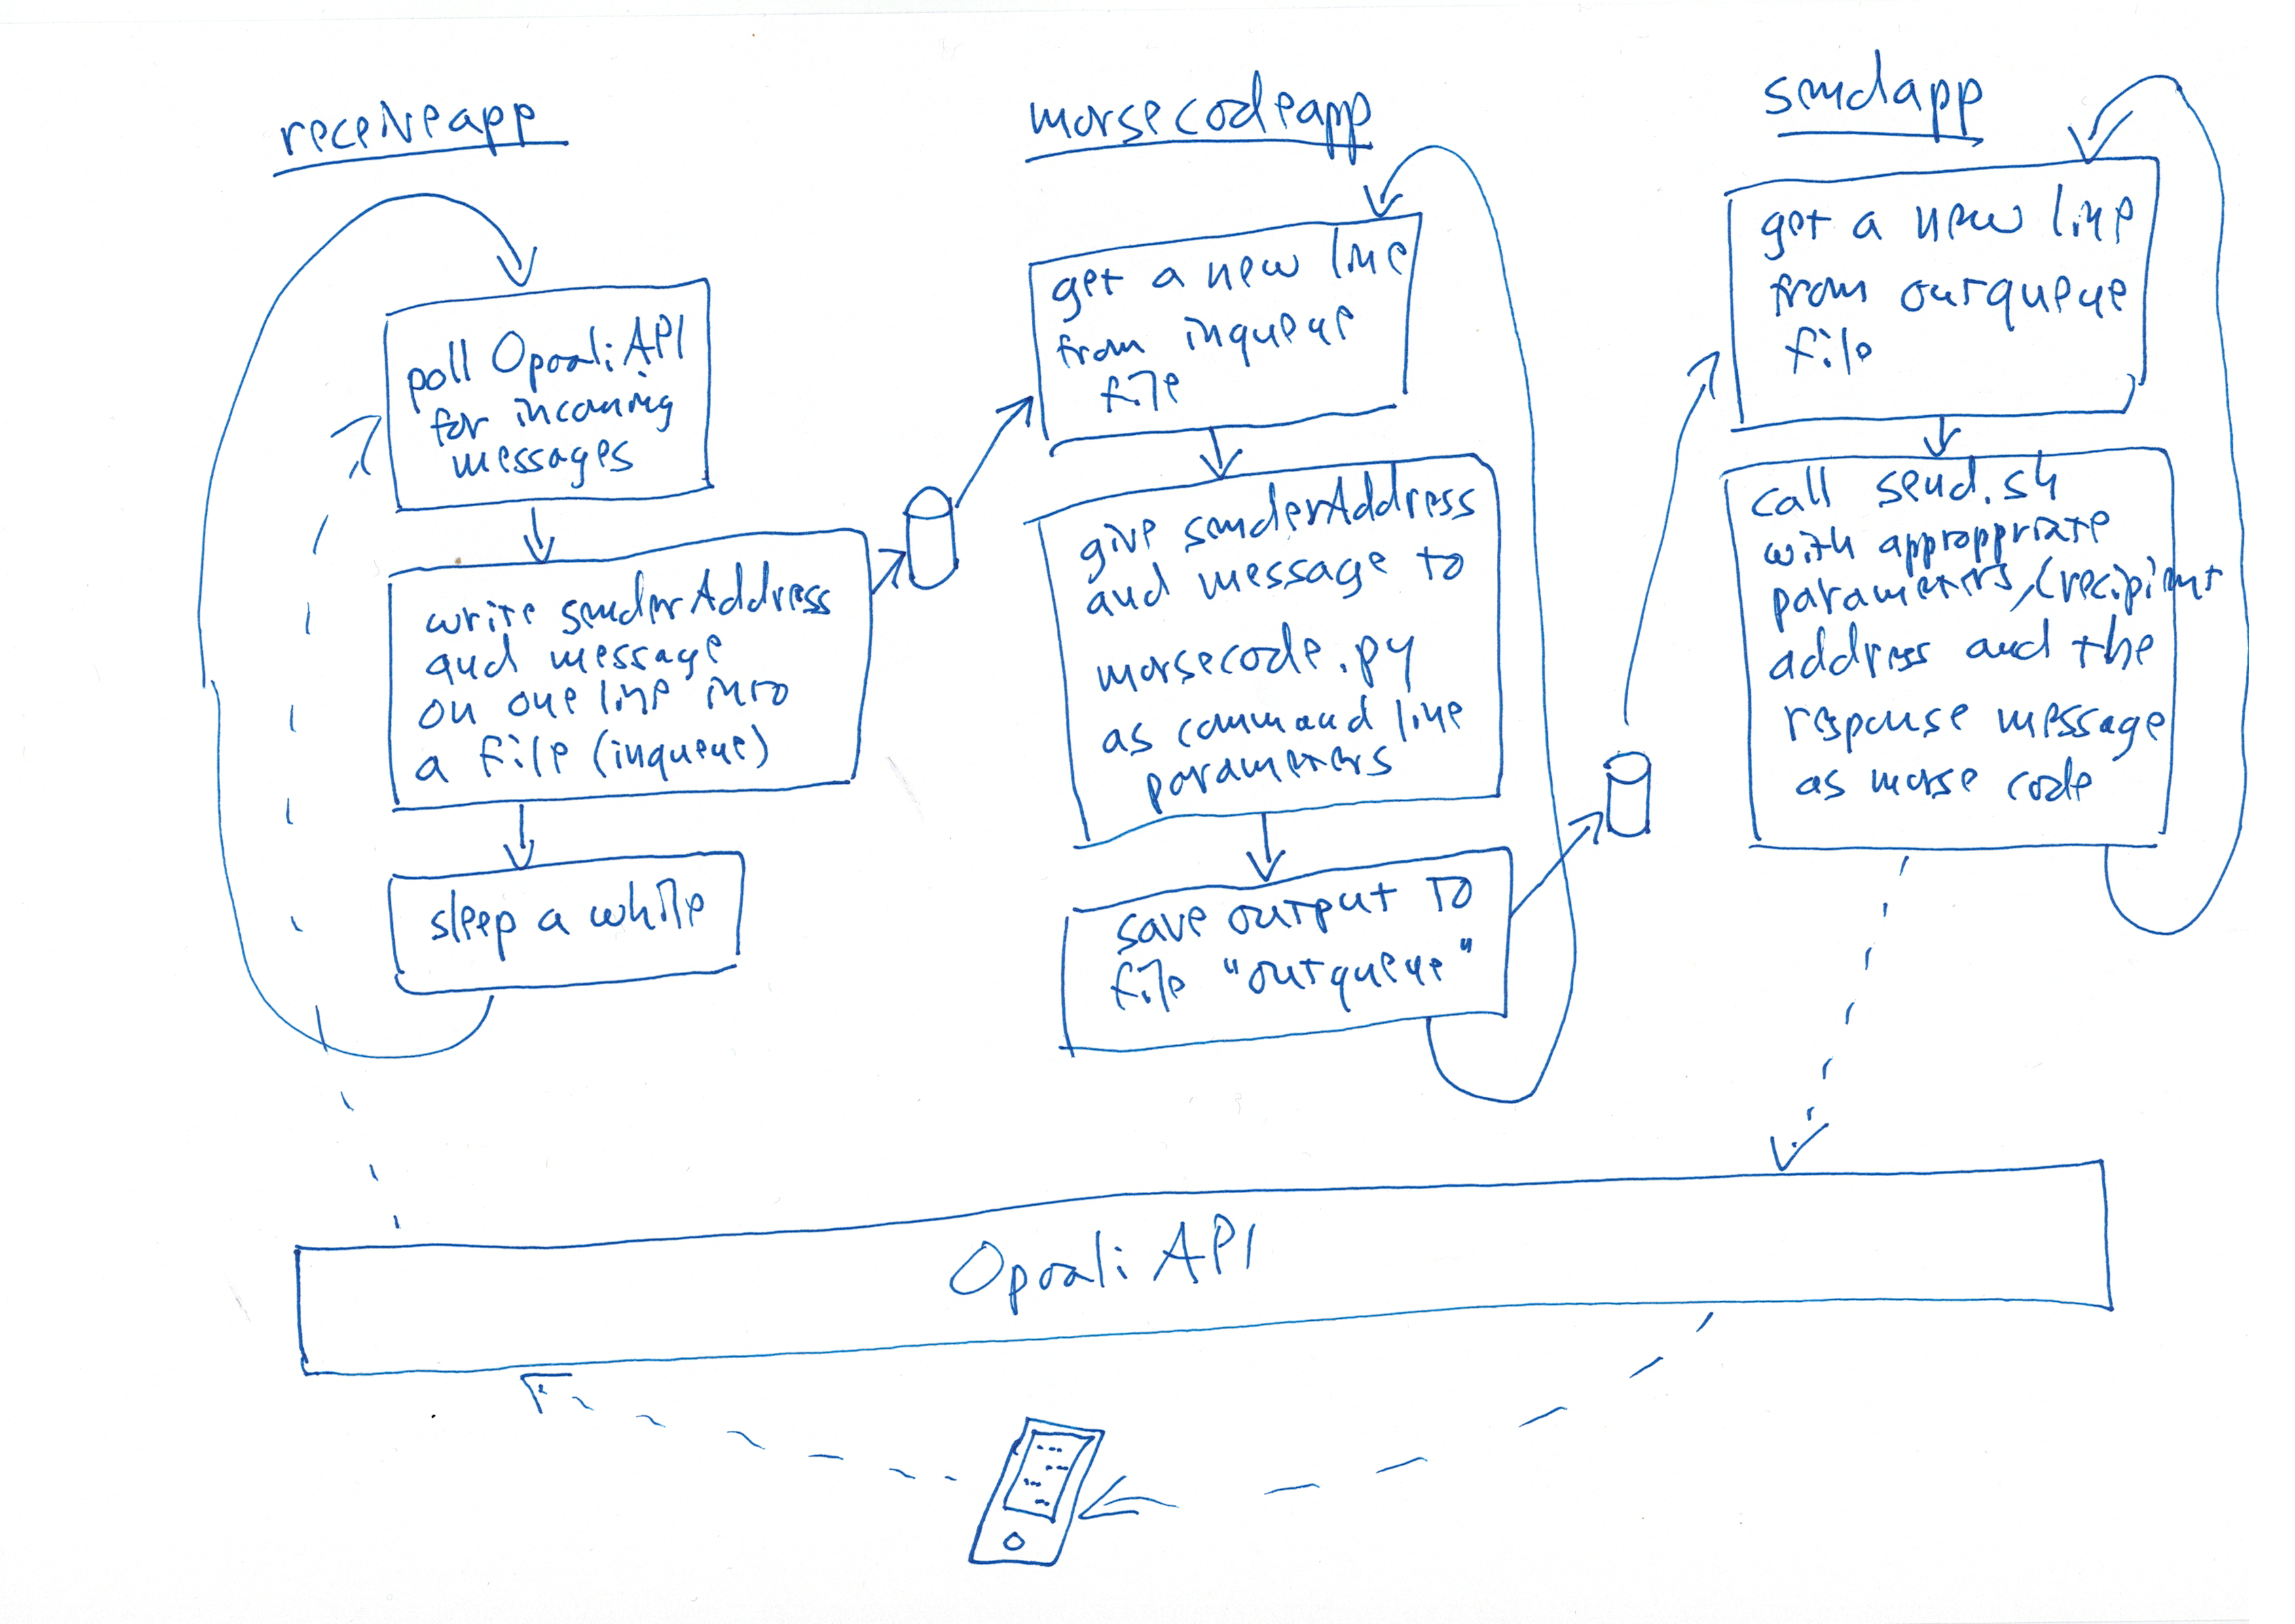
I made a quick Functional Specification of a Morse Code Service consisting of three separate applications:
- receiveapp to poll Opaali API with InboundMessageRetrieveAndDeleteRequest
- morsecodeapp to convert text to morse code and blink it (my Python script)
- sendapp to send the morse code as a response using Opaali API and OutboundMessageRequest
 Original specification for the morsecode app
My Raspberry Pi has wireless LAN which I use to access the Opaali API, but as I don’t keep it online 24/7 or even have a fixed ip-address, using Push Notification for incoming messages would be a bad idea. Polling for received messages makes much more sense for IOT devices.
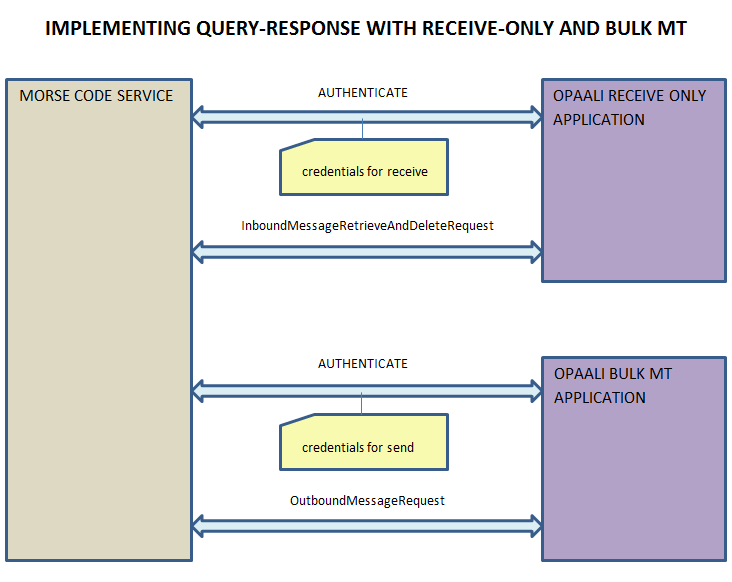
How to Query and Response when you are not allowed to do that?
For an application that receives a request as a MO SMS message and sends a confirmation message back, Query-Response would be the most logical type of application. You can do that, providing that your service contract is for “Telia Messaging Interface”. But if you have “Telia Mobile Message” instead, you don’t have access to Query-Response applications. However, you can implement that functionality using two separate applications:
- Receive-Only
- BULK MT
I’ll show you how to do it this way.
 Implementing Morse Code Service
You only need to write one application program which will make API requests to two Opaali applications. Just remember, that you will need two access_tokens and you need to authenticate separately to the two applications using credentials specific to that application. It is really not compilicated at all.
Prototyping with shell scripts
Many of my examples in this blog have been written as bash shell scripts, mainly because
- they are usually short enough to show here in full
- it is quicker to use trial-and-error programming paradigm with an interpreted language
- nowadays you can run bash scripts on most platforms (Unix/Linux, MacOS, Windows, even Raspberry Pi SBC!)
Shell scripts are a nice prototyping tool, because even if you don’t know the smartest way to do what you want, you can usually at least come up with a terribly complicated and inefficient way to get what you want.
(And I was on Holiday so I didn’t want to use much energy on writing good, well designed software…)
So my design was to have three applications (scripts) running simultaneously and passing information between them asynchronously using queues implemented as simple files (because I was feeling lazy and was on Holiday anyway…)
One application would write a line of output to a file and the next one would wait until there was something new in the file and then read the new line for its input. Sounds complicated to implement this waiting for input…unless I can use an existing command to do this…like when listing new lines from a log file using tail!
Something like this:
- receiveapp writes its output line by line to file inqueue:
$ ./receiveapp.sh >inqueue tailwaits until there are new lines in file inqueue and then outputs the last line only (if the file is empty it will wait until there is something to read)- tail output is piped to
xargs, which will extract two parameters from the line and give them as command line parameters to the morsecode.py python script - morsecode.py output is written as one line to file outqueue
$ tail -f -n 1 inqueue | xargs -n 2 ./morsecode.py >outqueue - similarly new lines from outqueue are passed as two command line parameters to sendapp
$ tail -f -n 1 outqueue | xargs -n 2 ./sendapp.shIf you didn’t guess already, the two parameters are the senderAddress and message so that sendapp can send the response message to the phone number where the original query came from.
(…and it took me a while to realise that I don’t really need inqueue and outqueue at all, because I can just use pipes on a single line…no need for tail either!)
$ ./receiveapp.sh | xargs -n 2 ./morsecode.py | xargs -n 2 ./sendapp.sh
Implementing sendapp.sh
I’ll start with sendapp.sh, because we already have implemented a shell script for sending (see Writing a send application as a shell script)
In fact, we only need sendapp.sh for passing the two parameters using the correct format required by send.sh:
#!/bin/bash
./send.sh -s '91589' -r "$1" -m "$2"
(91589 is the short code for my test application)
Implementing receiveapp.sh
We need to write code for the receiveapp.sh, but we can reuse bits and pieces from our existing send.sh script:
#!/bin/bash
#
# receiveapp.sh - an application for polling incoming text messages using Opaali API
#
# This is an example of using Opaali API from a shell script
# to poll for received MO SMS messages
#
# This is an example and not intended for production use as such
#
# Author: jlasanen
#

# resource Id for receive service
RESID='291ae4cc-51b5-48b9-9b8f-4d8e88a7c68a'

# file where your credentials are stored
CREDENTIALS_FILE=.opaalicredentials_ro

# read service specific credentials from a file
# containing the following two entries
# (uncomment and replace with your own credentials,
#  try to keep the file in a safe place so that your
#  credentials won't leak for others to use)
#applicationUserName="b535b0c5e5ae815cea82db6b3b25095a"
#applicationPassword='1%AMCC?w'
function read_credentials {
    #param 1: filename

    source "$1"
}


# print usage instructions and exit
function usage {
    #param 1: commandName

    echo "Usage: $1 " >/dev/stderr
    echo "       this application polls for received MO messages from Opaali and writes the senderAddress and message to stdout" >/dev/stderr
    exit 1
}

# print error message and exit
function error_exit {
    #param 1: commandName
    #param 2: msg
    #param 3: param

    echo "$1: $2 $3" >/dev/stderr
    usage "$1"
}


# authenticate and get access_token
function authenticate {
    #param 1: Application User Name
    #param 2: Application Password
    #global: access_token
    #global: emsg

    # construct basic_auth string by combining username and password separated
    # with a colon and base64-encoding it all
    basic_auth=$(echo -n "$1:$2" |base64)
    #echo $basic_auth
    # call Opaali API and capture the interesting parts from the output
    local output=$(curl -k -s -d grant_type=client_credentials https://api.opaali.telia.fi/autho4api/v1/token --header "Content-Type:application/x-www-form-urlencoded" --header "Authorization: Basic $basic_auth" | grep -E 'access_token|error')
    #echo $output
    # post processing: check for success or failure
    # we could test the return value, but choose to check the output only

    # try grabbing access_token from the output
    access_token=$(echo "$output" | grep access_token | cut -d\: -f2 | tr -d "\", ")
    if [[ -z "$access_token" ]]; then
        # access_token is empty so something went wrong
        local error=$(echo "$output" | grep 'error' )
        if [[ -n "$error" ]]; then
            # we got error message from Opaali API
            emsg=$(echo "$error" | cut -d\: -f2)
        else
            # something went wrong with curl (now testing return value would have beeen useful...)
            emsg="unknown error"
        fi
        return 1
    fi
    return 0
}


# main program
function main {
    #params: all command line parameters
    #parse_arguments "$@"

    read_credentials "${CREDENTIALS_FILE}"

    emsg=""
    authenticate "$applicationUserName" "$applicationPassword"

    if [[ "$?" -ne 0 ]]; then
        error_exit "$0" "$emsg"
    fi

    # enter main loop
    main_loop
}
We store the ResourceID for our Receive-Only application in global variable RESID and store the credentials into a new file .opaalicredentials_ro.
As receiveapp.sh does not use any command line parameters there is no need for parse_arguments so we can comment out the function call. In the main program we’ll just call authenticate function followed by calling the main_loop function:
# access_token is kept in a global variable
access_token=

# polling interval between checking incoming messages
INTERVAL=30

# loop checking for new messages
function main_loop {
    #params: none
    #global: access_token
    #global: emsg
    #global: RESID
    #global: INTERVAL

    while [[ true ]]
    do
        # check for incoming messages
        check_incoming $RESID
        if [[ -z $access_token ]]
        then
            #echo no access token, get one
            emsg=""
            authenticate "$applicationUserName" "$applicationPassword"
        fi
        # wait, do not call Opaali API too often!
        sleep $INTERVAL
    done
}
The main_loop loops forever calling check_incoming function with the ResourceID to process received MO messages, if there are any. After that you should wait for a while before doing this again, because calling Opaali API too frequently may degrade the performance of the whole system and you will hit your TPS limit after which any calls to Opaali API will fail until you are allowed to continue (the default limit is 10 TPS!).
# call Opaali API and get possibly available new MO messages
function check_incoming {
    #params: resource Id for receive service
    #global: access_token
    #global: emsg
    #global: RESID

    # call Opaali API and capture the interesting parts from the output
    local output=$(curl -s -k -d "{\"inboundMessageRetrieveAndDeleteRequest\":{\"retrievalOrder\":\"OldestFirst\",\"useAttachmentURLs\":\"true\"}}" https://api.sonera.fi/production/messaging/v1/inbound/registrations/$1/messages/retrieveAndDeleteMessages --header "Content-Type: application/json" --header "Accept: application/json" --header "Authorization: Bearer $access_token" | grep -e '"message"' -e '"error"' -e '"senderAddress"')
    # check output for senderAddress
    local msisdn=$(echo "$output" | grep '"senderAddress"' | cut -d: -f2- | cut -d: -f2 | tr -d '",')
    # check output for message data
    local data=$(echo "$output" | grep '"message"' | cut -d: -f2- | xargs -n 1)
    if [[ -n "$data" ]]; then
        # we may get multiple messages in one call so lets store msisdn and data into arrays
        mapfile -t msisdns < <(echo "$msisdn")
        mapfile -t datas < <(echo "$data")
        # get the size of array(s) and loop outputting matching msisdn and message
        count=${#msisdns[@]}
        for ((index=0; index < ${#msisdns[@]}; index++)); do
            echo "${msisdns[index]} \"${datas[index]}\""
        done
    fi
    # check for errors
    local error=$(echo "$output" | grep '"error"' )
    if [[ -n "$error" ]]; then
        # we got error message from Opaali API
        emsg=$(echo "$error" | cut -d\: -f2 | xargs -n 1)
        if [[ "$emsg" = "invalid_token" ]]
        then
            # access_token has expired, by setting it to empty string we will trigger reauthentication
            access_token=
        fi
    fi

}
check_incoming function will call retrieveAndDeleteMessages of the Opaali API and store the lightly processed output to variable output (just like in our previous code examples).
My shell script examples rely on the fact that Opaali API returns JSON data nicely formatted with each element on its own line. I don’t think the API actually guarantees this, so you really should use a proper JSON parser (like I use in my Java examples) in production code. This works well for prototyping purposes, though.
So I use grep to extract senderAddress and message values to their own variables. You can get zero, one or multiple received messages in one call to retrieveAndDeleteMessages so we need to store them in arrays and in the correct order so that we can link the correct pair of sender and message when we send the reply.
The code for doing this is a bit too complicated to explain here, so I’ll let you google how it works (…I had to do a lot of googling before I got it to work).
If you are wondering why I do the same thing seemingly twice in “| cut -d: -f2- | cut -d: -f2 |” that is because the senderAddress line looks like this:
"senderAddress" : "tel:+358401234567",
The first cut returns everything after the first colon, the second cut cuts out the “tel: prefix and finally “ tr -d ‘”,’ “
removes the trailing “,. (Note that the message can also contain the ‘:’ character.)
We also need to check against getting an “invalid_token” error after the access_token has expired. Setting access_token value to empty will trigger reauthentication in the main_loop.
And at the end of the script we should place our call to the main program:
# call main program
main "$@"

# end of script
Look! It works!
Here is a blurry video of me testing by submitting my latest project status report to the Morse Code service. Due to the 30 second polling interval the blinking starts somewhere around 0:43 into the video.
 JPLa is a member of the Content Gateway (CGW) to Opaali migration team, specialising in programming related issues and API usage.