Opaali uses an authorization framework based on IETF OAuth 2.0. To use the API you need to first get an access token to be added in the header of all subsequent API calls from the application to the platform for authentication and authorization.
This is described in the API_Telia_OMA_OAuth_REST.pdf document, which you can find in the Resources section of the Opaali Portal. It may not be the easiest document to understand, though…
The R4 (or Rel4) version of Opaali platform software introduced the API Console which should make getting started with the Opaali API easier. I haven’t used the API Console earlier and I haven’t read much documentation about it, but lets see how easy it is to use.
API Console
The dialog for making a token request to the OAUTHService seems simple enough – there is actually nothing you need to input (because it knows your Application Credentials and gets them automatically):
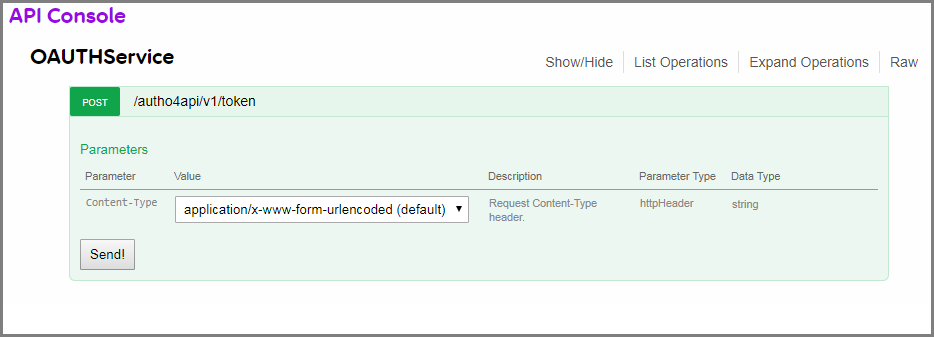 Opaali API Console
After clicking the Send! button we get a response:
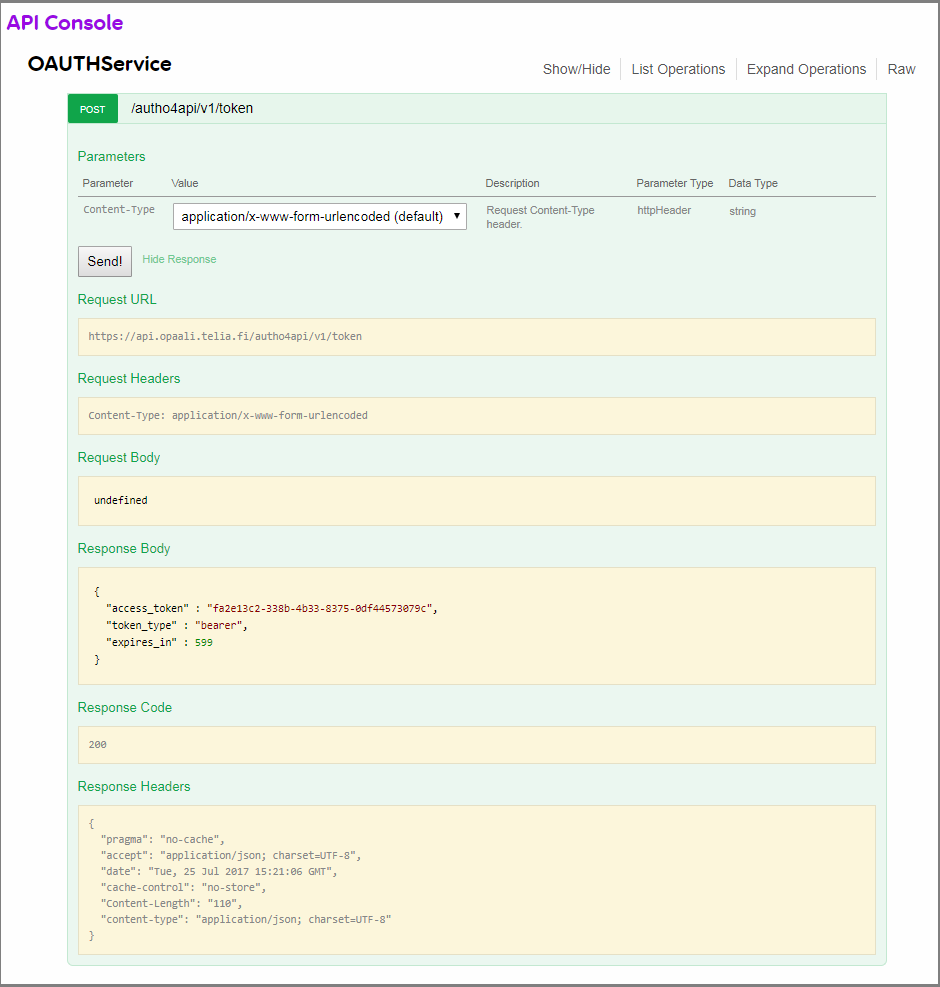 Opaali API Console response
From here we can see what the Response body looks like.
{
 "access_token" : "fa2e13c2-338b-4b33-8375-0df44573079c",
 "token_type" : "bearer",
 "expires_in" : 599
}
You will need the access_token value “fa2e13c2-338b-4b33-8375-0df44573079c” in subsequent API calls. We can also see that the token will expire in 599 seconds (about 10 minutes) so you will need to get a new one before that. We can also see what URL we should use in our request and which HTTP headers should be included.
Seems easy enough, almost too easy, as it turns out…
What the API Reference says…
This is an excerpt from the OMA Authorization REST API Guide:
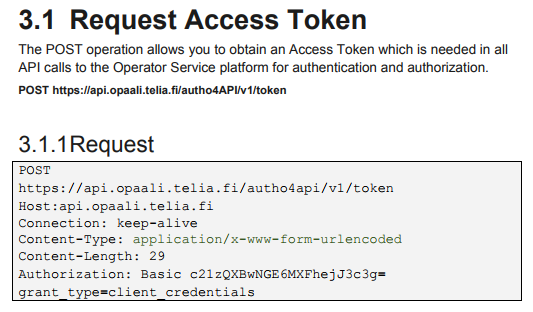
OK – using the API Console did not teach us how to build the Authorization header value, in fact – the whole Authorization header was missing from the API Console response. Also, we see that the request body should actually contain grant_type=client_credentials (maybe there is a bug in the API Console?). Despite its limitations, the API Console is an improvement that helps us in writing/testing our code.
Command line to the rescue
When I first started learning how to use the Opaali API I found it was easiest for me to use the curl tool from a Unix-like command line shell. In fact, you can get surprisingly far using a few common tools from any Unix-like environment.
The Tools
- you need access to a Unix command line (bash shell) or equivalent (e.g. mingw or Git Bash on windows)
curlis used for making http requestsbase64is used for base64 encoding/decodinggrep,cat,tr,sed,cutand other common unix tools will be used here to filter output (without much explaining their use in detail)
(Almost all of my tests are run from a Git Bash command line on Windows 7…that’s just my preference. Google around to locate versions of these tools for your own development environment.)
Building the Authorization header
To quote the API Reference: “Use the base64 (user name and password) method to generate Authentication and Authorization headers. These credentials are partner-specific and application specific and appear in the Manage Endpoints page for a partner of the Opaali Portal.”
What this means in practice:
You will first need to concatenate username and password separated with ‘:’ inbetween them.
You can use the base64 command line tool for encoding, but you need to be careful not to add any extra characters (such as newline) to the characters to be encoded. You should also use single quotes in case the password contains characters which have special meaning to the shell. The -n option of echo will suppress the newline: (important: Please replace with your own service’s username:password)
$ echo -n 'b535b0c5e5ae815cea82db6b3b25059a:1%AMvv?w' | base64
YjUzNWIwYzVlNWFlODE1Y2VhODJkYjZiM2IyNTA1OWE6MSVBTXZ2P3c=
$
You can now request the Access Token by making a HTTP POST request using Basic Authentication. Use the application specific base64 encoded credentials as shown before. For simplicity, we use curl command with the -k option to turn off certificate verification:
$ curl -v -k -d grant_type=client_credentials "https://api.opaali.telia.fi/autho4api/v1/token" --header "Content-Type:application/x-www-form-urlencoded" --header "Authorization: Basic YjUzNWIwYzVlNWFlODE1Y2VhODJkYjZiM2IyNTA1OWE6MSVBTXZ2P3c="
Running the command you will get something like this (the ‘-v’ verbose option lets you even see the request and response lines):
$ curl -v -k -d grant_type=client_credentials "https://api.opaali.telia.fi/autho4api/v1/token" --header "Content-Type:application/x-www-form-urlencoded" --header "Authorization: Basic YjUzNWIwYzVlNWFlODE1Y2VhODJkYjZiM2IyNTA1OWE6MSVBTXZ2P3c="
* timeout on name lookup is not supported
*   Trying 79.98.236.12...
* Connected to api.opaali.telia.fi (79.98.236.12) port 443 (#0)
* ALPN, offering http/1.1
* Cipher selection: ALL:!EXPORT:!EXPORT40:!EXPORT56:!aNULL:!LOW:!RC4:@STRENGTH
* successfully set certificate verify locations:
*   CAfile: C:/Program Files/Git/mingw64/ssl/certs/ca-bundle.crt
  CApath: none
* TLSv1.2 (OUT), TLS header, Certificate Status (22):
* TLSv1.2 (OUT), TLS handshake, Client hello (1):
* TLSv1.2 (IN), TLS handshake, Server hello (2):
* TLSv1.2 (IN), TLS handshake, Certificate (11):
* TLSv1.2 (IN), TLS handshake, Server key exchange (12):
* TLSv1.2 (IN), TLS handshake, Server finished (14):
* TLSv1.2 (OUT), TLS handshake, Client key exchange (16):
* TLSv1.2 (OUT), TLS change cipher, Client hello (1):
* TLSv1.2 (OUT), TLS handshake, Finished (20):
* TLSv1.2 (IN), TLS change cipher, Client hello (1):
* TLSv1.2 (IN), TLS handshake, Finished (20):
* SSL connection using TLSv1.2 / DHE-RSA-AES256-GCM-SHA384
* ALPN, server did not agree to a protocol
* Server certificate:
*        subject: C=FI; L=Helsinki; O=TeliaSonera Finland Oyj; CN=api.opaali.telia.fi
*        start date: Jun 27 12:27:28 2017 GMT
*        expire date: Jun 26 12:27:28 2020 GMT
*        issuer: C=FI; O=TeliaSonera; CN=TeliaSonera Server CA v2
*        SSL certificate verify ok.
> POST /autho4api/v1/token HTTP/1.1
> Host: api.opaali.telia.fi
> User-Agent: curl/7.47.1
> Accept: */*
> Content-Type:application/x-www-form-urlencoded
> Authorization: Basic YjUzNWIwYzVlNWFlODE1Y2VhODJkYjZiM2IyNTA1OWE6MSVBTXZ2P3c=
> Content-Length: 29
>
* upload completely sent off: 29 out of 29 bytes
< HTTP/1.1 200 OK
< accept: application/json; charset=UTF-8
< cache-control: no-store
< content-type: application/json; charset=UTF-8
< date: Wed, 26 Jul 2017 14:21:27 GMT
< pragma: no-cache
< server: Operator Service Platform
< Content-Length: 110
<
{
  "access_token" : "c213cdfc-c1f1-4862-8810-199b8ea7ce7a",
  "token_type" : "bearer",
  "expires_in" : 599
}* Connection #0 to host api.opaali.telia.fi left intact

$
Using the magic of pipelines and shell scripting the access_token value can be extracted from the response. To make further use easier, you should capture the access token into a shell variable, in this way:
$ access_token=`curl -k -d grant_type=client_credentials "https://api.sonera.fi/autho4api/v1/token" --header "Content-Type:application/x-www-form-urlencoded" --header "Authorization: Basic YjUzNWIwYzVlNWFlODE1Y2VhODJkYjZiM2IyNTA1OWE6MSVBTXZ2P3c=" | grep access_token | cut -d: -f2 | tr -d "\","`
This only works if everything goes right - you should display the content of the access_token variable to check it looks ok:
$ echo $access_token
9152c00c-c605-4c0d-a8d2-9182981e1aa5
(actually you may want to store your Basic Auth string into a variable also, because you will need it again when your token expires)
(and sorry for my old-school notation of using backticks to extract the output of a command - I’ll try to switch to the newer $() notation)
Now that you have an access token you can start using the other API calls for sending or receiving messages. Notice that the access token is service specific and you may need a different token for sending and receiving. The token will eventually expire and things will stop working, usually you will get someting like this as a response:
{
 "error" : "invalid_token"
}
You will then need to authenticate again. To avoid this error you should make sure you will get a new access_token before the old one expires, but don’t do this more often than is needed (if the token expires in 10 minutes wait at least 9 before getting a new token). There is a limit to how frequently you can make API Calls, exceeding your TPS limit will make your following API Calls fail until you have paused for a long enough (it isn’t really long) time.
Onwards
There is more to access token and session handling than this and we’ll get to that later. Now we have learned enough about authentication to make our first useful API Call. More about that in the next episode…
 JPLa is a member of the Content Gateway (CGW) to Opaali migration team, specialising in programming related issues and API usage.